DIY Mudroom Built In
DIY Mudroom Built In/Hall Tree with a Bench & Drawers
When we moved into our home (going on 4 years ago now) I had a vision for this little wall from the start. I knew I wanted a "mudroom" but being in California those don't exist, new builds are starting to incorporate them but not to the grandness of those beautiful country homes gracing our feeds lately. If you are looking for that craftsman/farmhouse charm of a place to hang your coat or sit down to put your shoes on and lack a dedicated room but have a wall...this is the tutorial for you! You can absolutely change this to fit your needs or space, don't have room for a bench just extend the board and batten to the floor and you can still have a coat hook wall.
Materials:
2x4's : frame for bench cabinet
1/4 inch plywood : board backing
3/4 inch plywood : bench cabinet and drawers
3 1/2 inch common board strips : horizontal "batten" and trim piece for the bottom of bench cabinet
2 1/2 inch common board strips : vertical "batten" and horizontal "batten" on upper squares
2 1/2 inch common board strips : trim pieces on bench cabinet and drawer faces
1 1/2 inch poplar trim : trim on ledge and bench cabinet
orbital sander
screws
pocket hole screws
nails
Paint:
Hardware:
This wall is in our entry hallway which is an odd area to say the least but it is the way to the front door and garage door so its the perfect landing space, we have had this bench and shelf since we moved in and it was a great little area for awhile but was always cluttered and I was ready to brighten this hall up with a big show stopping white built in.

On the left is my design for the space, I know super great artwork right? Scott's is the one with math and all that fun stuff...
The Build:
First remove your baseboards
Build a frame for what I'll just call the bench to sit on by screwing 2x4's together and then screwing that into the walls. We always leave a message hidden behind every project we do.
Make sure you level this frame using shims if needed.
The bench is made with plywood. That Scott screwed together to essential make a big (2 sided) box. We did not add a back to this because we will be doing drawers, if you will be making open cubbies you may want to add a 3rd side to this on the side that will be on the wall.
Measure for your cubbies.
We will be using two pieces of plywood per divider because that is the thickness of the trim we will use so it gives it a nice flush chunky look. You will need to account for your dividers and sides when making your measurements to get the spacing correct.
For this project the dividers were just screwed from the top and bottom of the bench and not actually attached together. Another way of doing this is to pocket hole one piece of the plywood and secure that piece first than glue the other piece to the plywood with the pocket holes that way you have no visible pocket holes, this works great for bookcases but for this being a bench we wanted the added strength of having both pieces being secured.
You'll sit the bench right on top of the frame
Scott had a pretty cute little assistant come to help with this.
Screw the bench into the frame. 4 screws per section
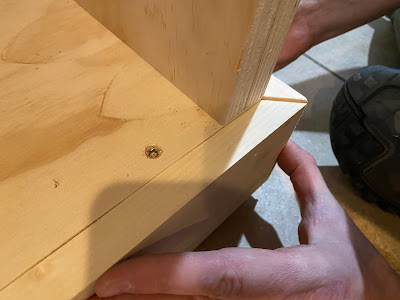
Add your trim to the base of the bench and on the dividers to cover up the two pieces of plywood, you could also reattach your base boards after this if you will be keeping them.
This is 3 1/2 inch common board strip
Adding the trim pieces to each section and we also did add trim to the side of the bench, just a simple square.
We have very textured orange peel walls so the easier way of doing board and batten sans the board was not an option for us. If you don't have textured walls you can totally skip the back panels if want this to be easier/cheaper. We just used a brad nailer to nail the back board to the wall, the batten strips, and the trim pieces.
We have some areas that Scott had to cut around to fit this wall. The ceiling beam and the stair ledge. I know I won't be able to explain how to do this without it sounding so confusing so if you need to do this too just look it up.
I was having trouble explaining the way I wanted the batten to be to Scott so I decided to use tape to show a simplified version of my vision. I wanted this to have the traditional large vertical rectangular sections that will be below the shelf area and above the shelf I wanted to have smaller squares to keep your eyes moving up the wall to make this wall look bigger and taller (we have 9 foot ceilings but some optical illusions are a must in home design!)
After we had the design figured out we added the first horizontal board (the one on top in the picture below) above that will be the shelf so we needed to have that first to make sure all the measurements would be off that board. Then the bottom board we accounted for the thickness of the bench seat too make sure none or very little of that board would be covered in order to get everything symmetric.
Then we did the side pieces and eyeballed the centered strips off the bench dividers you want this to create 3 separate sections. We did measure after eyeballing and move those strips slightly if needed.
We will leave the top for last because we needed to figure out the shelf situation in order to have equal squares once the shelf was installed. I hope this make sense.
Originally I planned to do a 6 or 7 inch shelf with corbels to make the sections seem more like cubbies/lookers but after seeing how big this was making our wall look and loving the height of the vertical rectangle sections I decided a ledge would be a better way to separate the two sections. I felt a shelf would add too much of a shadow and just chop the whole thing up.
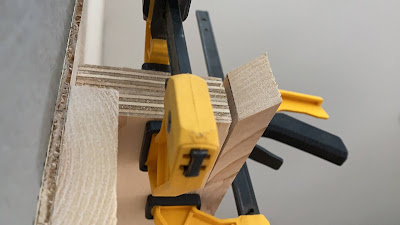
Again, we used the two pieces of plywood method and used the pocket hole method on this. So, pocket holes on the bottom piece of plywood and screw that to the wall. Then use wood glue to secure the top piece and then clamp until dry (a few hours).
While it was drying we added the trim to the ledge (again if you want your shelf or ledge to be an exact depth make sure you account for the thickness of your trim when cutting your plywood.) Plywood ledge: 3 inches
Trim: 3/4 inches
Ledge is 3 3/4 inches
Just like the bottom section start with your top batten strip (ceiling)
Then we did the middle after measuring from the top board to the ledge (we did not do a piece on top of the ledge it just is not needed for this area)
(The middle horizontal strip is the 2 1/2 inch board if we did the large piece we wouldn't be able to have squares and it would not look right in my opinion.)
Then do the sides and again eyeball the middle pieces to line up with vertical pieces of the bottom section and then measure to make the squares exact.
And now it finally makes some sense right?! The bottom vertical rectangle section is 6ft to the ledge and I love tall this is. For the bench we will be using leftover butcher block from our pantry renovation so we just set in on to see how it would end up looking.
I also had Scott make the strips by that ceiling beam not cut out around the beam like he did the back board I knew that would bug me if we did that. So he had to cut that strip with and angle on the back to make it fit.
Once you have added all your trim and are done doing anymore nails you need to fill all the holes and imprecations. I used Dap Plastic Wood in White sense I will be painting this white.
You simply put the tube on the hole, squeeze until a little comes out of the nail hole and leave that overflow there. When it dries the filler shrinks a bit and you will just sand any remaining.
I also look for any knots in the wood or pieces that might have split and I'll use the wood filler to fix those areas too.
I don't have photos of the next step which is sanding but, once the wood filler dries you need to sand every inch of this. I used 120 grit sand paper and then 220 grit sand paper.
Once sanded you will take a cloth and wipe it clean and then vacuum all of it as well.
Then you can prime. I used KILZ 2 Primer, a brush for the edges/hard to reach areas and then a small roller for the rest.
When the prime is dry you will have to sand everything lightly again with a 220 grit. (this time I bought sanding blocks and those are amazing.)
Priming is a step you don't want to skip, I know it seems like extra work but its worth it if you want a smooth professional finish. When you apply primer, paint, or stain on wood the grain will rise slightly (even if you sanded previously) so you have to go in again just to smooth it back out. It also helps with paint coverage so you can use less and have a more even coat.
Because we are doing drawers in the cubbies I did not paint the inside, I did just paint about 3 inches into it incase that ends up showing.
For paint I use BEHR White Satin Enamel Urethane Alkyd Interior/Exterior Paint (I wanted semi or gloss but we did this during the first week of COVID-19, while Shelter in Place was happening in CA so we were limited on paint options)
Once the paint was dry we removed the tape and screwed to butcher block to the bench.
When paint is dry you can install the hooks
We did put cutting board oil on the butcher block (again its what we had on hand).
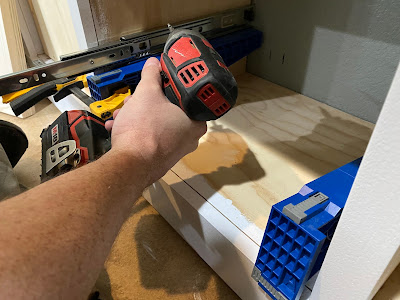
Using the Kreg drawer jig Scott installed the drawer sliders
For the drawer fronts we used leftover 3/4 inch plywood and used the leftover 3 1/2 inch common board strips (the horizitonal pieces of the board and batten) and used the Kreg rip cut to cut it down to match the 2 1/2 inch strips (the vertical batten pieces). We used the cut down strips to created the trim boxes for the drawer faces.
There are many ways to build drawer faces so these may not work for your build but they are an easier way that doesn't require routing and like I've said we are only working with what we have on hand.
I did not get photos of Scott building the drawer boxes but he just built a box. No need for us to make anything more fancy this but just like the drawer fronts there any endless ways to make drawers.
You'll attach the drawer faces one of two ways. Most are attached just by the handle but because these are thicker than normal ones we did screw them to the drawers from the inside of the box on the sides, make sure to screw through the area that the trim is on so your screw doesn't come through the center of the face.
Scott then installed the slides onto the drawers and adjusted them. (I know I will not be able to describe how to do this so read the instructions on your slides/the Kreg Jig).
I filled all the nail holes again with the Plastic Wood wood filler and then Scott used n orbital sander to sand the fronts faster than I could by hand. I primed the fronts and then sanded them with a 220 grit sanding block. You can see in this picture the left side is primed and sanded while the left side you can tell has raised grain.

I did two coats of paint and then Scott attached the handles. I like the look of unfinished wood for drawers so I did not paint the drawers themselves. We will eventually be adding a thin trim to cover up the plywood edges on the top of the drawers because I don't love the look of plywood edges but this is not necessary.
*update to instructions now that I know better*
Caulk after you sand the primer and before you paint (two coats of primer & paint for the best finish sanding in between each coat)
I caulked after I painted and I will be honest that I need to do some touches up now. Don't do that :)
If this was helpful for your build please tag me in your photos and follow me on Instagram @crystalransons & subscribe to this blog for more DIY Home projects!
Feel free to message me with any questions you have if something was not answered above.
*this post contains affiliate links


Where do you get 12" wide butcher block?
ReplyDeleteHome Depot. It’s 24” wide countertop. Just rip on tablesaw.
DeleteThis makes for such a cute entryway! I love it so much! I am trying to plan our next home project & might have to try this. We are having our kitchen cabinets painted this week & I am already getting excited for the next haha. Thanks so much for sharing!!!
ReplyDelete