Posts

Showing posts from October, 2020

One Room Challenge Week 4: My Vision is A Reality

Image
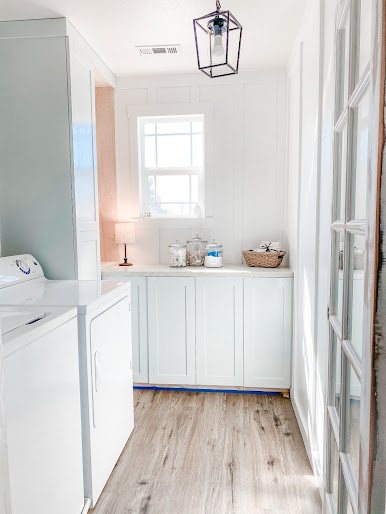
 One Room Challenge Week 4 Last week we left off with two of three board/batten walls finished and cabinets not quite finished yet. Also some "if's" on wallpaper and the light I choose. Well, I am happy to say we got A LOT done this week! Let me refresh your mind with where we started a few weeks ago... and this is what 4 weeks of hard work has given us! I stand my point made in last weeks post about how important lighting is in a space. More importantly the fixture itself. A commercial type light like we had before gives nothing to enhance a room but takes away from it. This new light really gives this room the nudge it  needs to go from a place you stand and do laundry to a room you want to  be in just to look at the detail s. Something easily added to make our cabinets look built in is a top trim/molding, it continues along the lines of the board/batten molding but is paint to match the cabinets. Let's talk decor in a utility room Even though we have a few more wee

One Room Challenge Week 3 Update: It's coming together!

Image
 One Room Challenge Week 3 This is the week that my vision really started to come together... Last week we left of on the cabinets being installed and adding the countertop We quickly realized we needed to get the washer/dryer back in this room or we would all be out of clothes very, very soon. So, over the last weekend we worked as hard as we could to get the broom cabinet built/installed and painted & the board/batten wall finished. We had to do the areas that I knew I wouldn't be able to get to after they were back in the room. It was a lot work but it totally paid off. We went with a simple craftsman style door trim and than finished the wall off with floor to ceiling board and batten. The broom cabinet Scott built was made in order to hide the dryer vent and again we chose not to do backs on these cabinets (just support pieces to screw the cabinet to the wall) to save money on wood and I just didn't find it necessary for the space to have back. For paint I used the Kil

One Room Challenge: Week 2 Floor & Cabinets!

Image
 One Room Challenge Week 2: Flooring and Cabinets If you look at the photos it may not seem like much was done this week. But, this project has layers (like a cake or lasagna, don't judge me, I am pregnant if you are new here and yes I'd love some cake, thanks) and in order to start the true transformation we have to get through about 4 layers. Layer 1: Clean out and up The first step in any room makeover is to get everything out. Scott first took down the wire shelf and the all junk that came with it, then moved out the washer/dryer and cubbie . It's a blank slate... Layer 2: Flooring We went with  Traffic Master Vinyl Plank Flooring  because it's a floating floor that doesn't require us to demo the existing tile...less work/less mess...heck yes! It was so easy to install because of the tongue/groove design, the only tricky part is randomizing the pattern. We choose a waterproof plank since it will be exposed to moisture and possible water, hopefully not though. La